Project interface
Whiteboard scaling
To fill your whiteboard, it is recommended to use a scaling of approximately 60 - 80%.
The scaling of the whiteboard is set between 1% and 400%. If you zoom out very far, newly created objects will appear very small.

Features
A toolbar is located on the left-hand side of your screen, on which the most important functions can be found. The individual functions are explained below.

Select
There are three options for selecting objects here:
- Single: Default setting. You select individual objects and can then interact with them or move them.
- Multiple: You can use this to select several objects at the same time, e.g. to move them.
- Area: This function allows you to select an area. All objects within the selected area are selected.
- Select locked objects: This allows you to reselect and unlock previously locked objects. After using this function, it is recommended that you deactivate it again.
- Clickable URLs: This function should remain activated so that inserted links provide a direct reference to Internet pages.

Card (notepad)
The "Card" function can be used to create notepads. You can choose between square and rectangular templates, and it is also possible to create 5 or 10 notes at the same time. The cards are created in the desired shape by selecting the color. Drag & drop is also possible to position the notes directly where you want them.
If you edit a card, you can create a new card with the same formatting using the tab key.

Text
The "Text" function is similar to the "Map" function. Instead of a notepad, a free-standing text is created, which is particularly suitable for headings or longer sections. You can choose between different fonts, colors and sizes.
Texts in cards, shapes and in the text object itself can be formatted granularly (bold, italic, underlined, color).

Documents and pictures
The "Doc" function allows you to upload documents such as common Word formats, PDFs, Excel and PowerPoint files to the whiteboard. It also allows you to extract individual pages for subsequent editing.
If you want to upload images, use the "Images" function. With both functions, you can drag and drop the file into the field provided or use the "Browse files" button to upload the data in the usual way.
In the case of images, you can also take a screenshot or search the web.

Media
If you want to upload videos or embed YouTube videos in the whiteboard, you can do this using the "Media" function. When selecting YouTube videos, you can use the search field to search for and import the desired video.
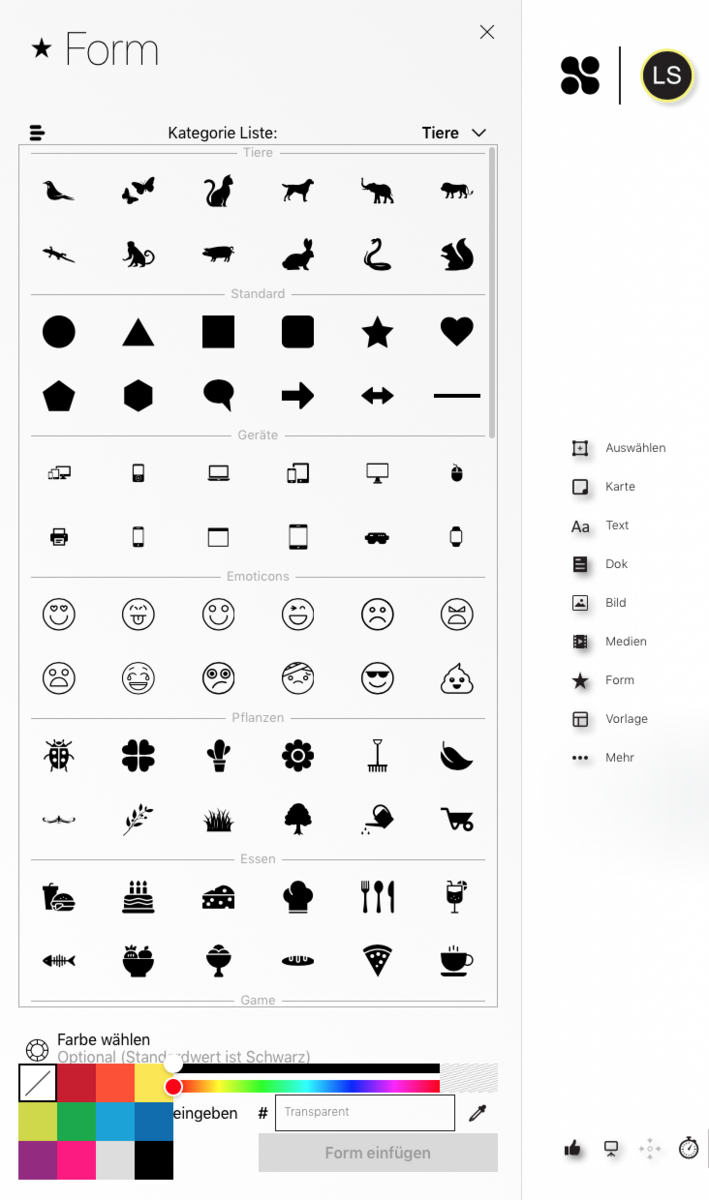
Shapes
The "Shape" function is ideal for customizing your whiteboard or creating areas on your board. Here you can choose between different categories to quickly find the desired shape. You also have the option of clicking on "All shapes" to get a larger display of the different shapes.

Templates
To make it easier for you to create whiteboards, Collaboard offers the "Template" function, where you can find suitable templates for different areas and then further customize them according to your plans.

Comments & Links
Under "More" you will find two more functions:
- Comments: This function is particularly suitable for interactive collaboration with larger groups. It can be used to comment on individual objects or ideas.
- Embed: This function allows you to place links on the board in such a way that you are referred directly to the desired page.

Advanced Features
In the bottom left-hand corner of the whiteboard, you will find advanced features that are only available to you with a license. The following functions are accessible here:
- Voting: If you click on the "thumbs up" button, you can start a vote. For example, you can have ideas evaluated or find agreement on an idea more quickly. People with moderation rights can now share all voting results or selected voting results with participants on a board with a single click.
- Presentation mode: If you click on the presentation icon, the entire whiteboard will be locked for the duration of the presentation and all users will follow the moderator's window directly.
- Get attention: This function is useful for drawing the attention of individuals or the entire group to your area, this will change the focus of the selected people to your field of vision.
- Timer: This allows you to set a timer for all participants. This makes it easy to set a common time limit.
People with moderation rights can hide content for other users on the board. This is particularly useful if you don't want to show participants everything on the board. You can gradually show the content and make it accessible to everyone.

Drawing
You will find the Draw function in the top right-hand corner of your screen. This turns your computer mouse into a pencil, ballpoint pen, brush, marker, fountain pen or eraser. You have the option of selecting different pen thicknesses and colors. Please note that after using the Draw function, click on "Single" again under the Select function so that you can move freely on the whiteboard again.

Project interface settings
The settings for the respective projects can be found at the top right of the project. To do this, click on the corresponding symbol as shown on the right of the image.

In the settings, there are the subcategories General and Standard.
Under "General" you will find setting options that affect your project interface as a whole. For example, you can change the background color of your interface here or adjust the UI size (size adjustment for font and symbols on the project interface).
Under "Standard" you will find setting options that adjust the default settings of individual objects (maps, text or connectors) in your project.

