Manage people
The content on this page was translated automatically.
Contents
Add new contact
There are various options for creating a new contact in the People module:


Key combination
To do this, press "Ctrl" + "N"
In the "Start" tab
Under the "Start" tab and select "New contact"
Switch to the e-mail module (1), select an e-mail (2) whose sender you would like to create as a new contact.
If you now move the mouse over the name of the sender (3), a small business card is displayed (4), click on the "arrow" in the bottom right-hand corner and the business card is displayed in full.
At the top of this card you will see the "Add" button (5), click on this and a new window will open with the option to add further contact details.
Add new contact (web access)
To create a new contact, please click on the "New" button in the top menu bar. You can then enter the desired contact details and confirm your new contact with the "Save" button.

Forwarding people
Just like appointments, people can also be forwarded.
To do this, select the desired person, go to the "Start" tab and click on the "Share" tab in the ribbon and then on the "Forward contact" drop-down field. Next, select the way in which the person is to be forwarded, as a "Business card" or "Outlook contact".
Then proceed as you would with a normal e-mail.

Creating contact groups
Outlook allows you to send messages to several recipients at the same time using contact groups, but there are also various mailing lists at the University of Kassel independent of Outlook. All public mailing lists and further information on how to use them can be found at the following address: lists.its.uni-kassel.de.
If you would like to use existing contact groups on the Exchange Server, proceed directly to step 2.
1. create contact group

To create a contact group, click on the Contacts icon at the bottom of the sidebar and then on "New contact group" at the top of the ribbon.
In the window of your newly created contact group, first enter a name for your group, then you can add members from various sources, such as your address book or a global address list.
To add members, click on "Add members" at the top of the ribbon, now you can select whether it is an existing contact or whether you want to create a new one.

2. send emails to contact groups
To send a mass mail, enter the name of your previously created group in the recipient field, after a few letters the group name should be suggested to you. Now confirm your entry with the Enter key.

Bear in mind that all recipients of your mass mailing can see who else you have sent the e-mail to. You should avoid this at all costs due to possible breaches of data protection!
If you want to prevent this, enter the group name in the Bcc field. If the Bcc field is not visible for you, you must first activate it. To do this, click on the "Options" tab in your mail window and then on Bcc.

Creating contact groups (web access)
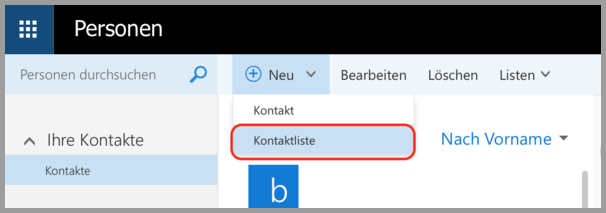
With contact lists, you have the option of grouping several contacts, e.g. to send an email to several contacts at the same time. To create a new contact list, click on the small arrow next to the "New" button in the top menu bar and then select "Contact list".
Now enter a name for your list in the "List name" field. You can then add members to the group by entering your name in the "Add members" field. As soon as you have started to enter the letters of your desired member, a list of suitable search results from your existing contacts will be displayed. If, for example, you would like to add an e-mail address that is not yet saved in your address book, you can simply enter it in the field and confirm with the Enter key. You can also enter notes about your list in the Notes field.
Once you have completed your list, click on the "Save" button at the top.
