Access via Thunderbird
The content on this page was translated automatically.
The exact illustrations of the individual steps in the instructions may vary slightly depending on the Thunderbird version.
If you are setting up for the first time, the following screen will be displayed directly (see right). If you are not setting up for the first time, click on the three dashes at the top right and then on "New account" and "E-mail" so that the following login screen appears.
Now enter your name and e-mail address. Do not fill in the "Password" field. As soon as you have completed the email address <e.g. ukxxxxxx@uni-kassel.de>, the "Set up manually" button will appear. Click on this.

Fill in the remaining fields as shown in the picture:
- Enter mail.uni-kassel.de as the host name for the incoming and outgoing mail server.
- Enter your UniAccount followed by @uni-kassel.de as the user name in the incoming and outgoing mail server, e.g. <uxxxxxx@uni-kassel.de>.
Then click on "Done" and enter the password of your UniAccount in the pop-up window. The mailbox is now integrated.

After integrating the e-mail account, please check the correct folder assignment. To do this, click on "Account settings" in the top right-hand corner.
Now click on "Copies & folders".
Please check that the sent emails are stored in the "Sent items" folder on the @uni-kassel.de email account and change the settings if necessary.
Drafts should be stored in the "Drafts" folder on the @uni-kassel.de mail account . The templates should also be stored in the "Templates" folder on the @uni-kassel.de mail account.
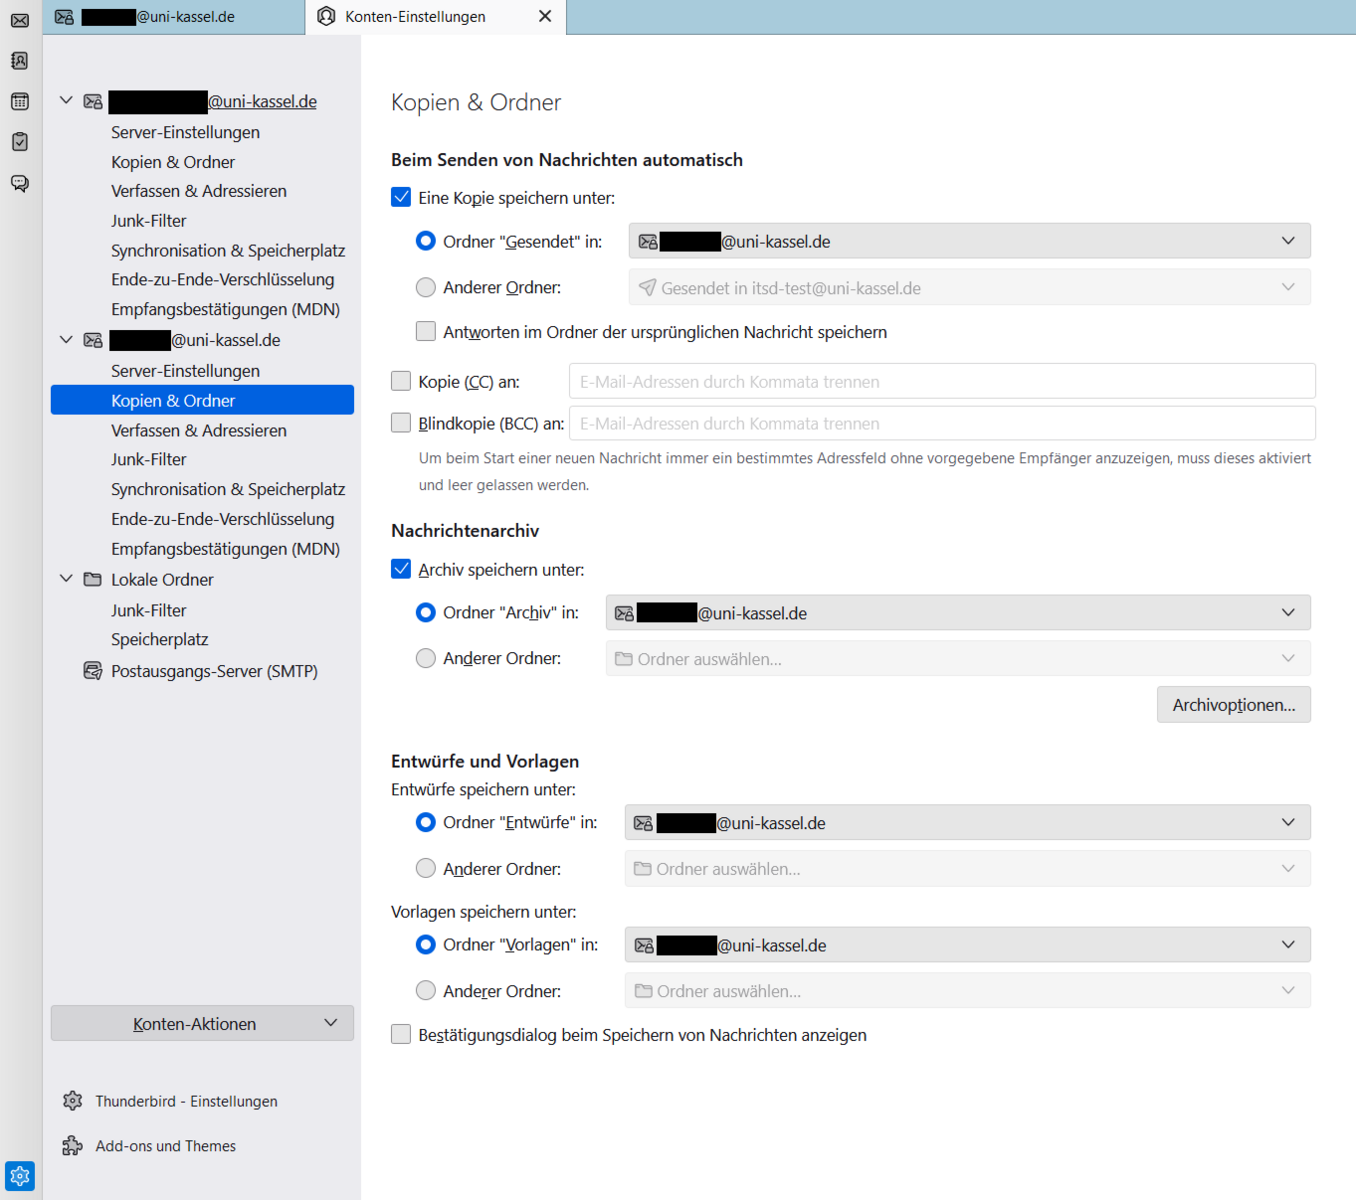
Next, check whether the deleted mails are also stored in the "Deleted items" folder on the @uni-kassel.de mail account.
To do this, please click on "Server settings" and look in the section "When deleting a message".
If not all folders are displayed, it is necessary to subscribe to the corresponding mailbox. To do this, right-click on the relevant mailbox and click on "Subscribe".
You can then subscribe to the subfolders of the mailbox, e.g. <Sent items>.

Synchronize Exchange calendars
The synchronization of the Exchange calendar with Mozilla Thunderbird is only possible up to and including version 140.7 ESR.
There is currently (as of February 2026) no compatible plugin for calendar synchronization with Exchange available for newer Thunderbird versions.
Unfortunately, you can only synchronize your personal calendar in this way and not shared calendars.
You need the add-ons "TbSync" and "Provider for Exchange ActiveSync" for this functionality.
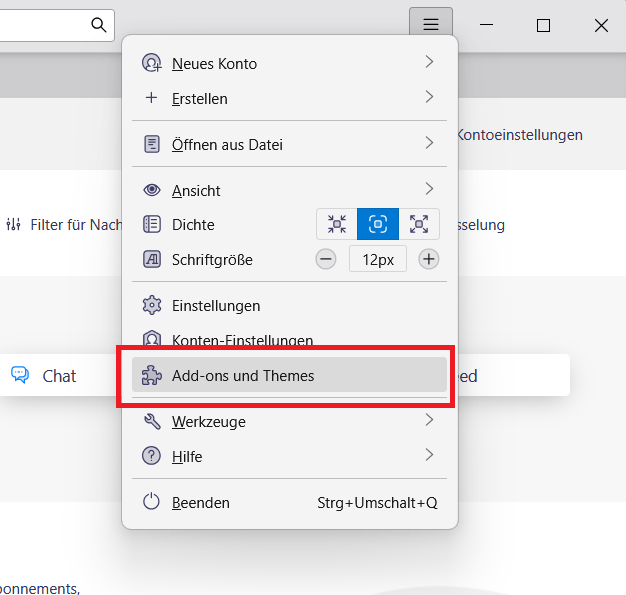
Install the add-ons "TbSync" and "Provider for Exchange ActiveSync" by first clicking on the three dashes at the top and then selecting "Add-ons and Themes".
Then search for the two add-ons and select "Add to Thunderbird". Then confirm your selection in the pop-up window by clicking on "Add".

To embed the Exchange calendars via the add-ons, click on the cloud icon (or TbSync icon) and then on "Synchronization settings".

After you have successfully opened the synchronization settings of Tbsync, select "Add account" and "Exchange ActiveSync".

Then select "User-specific configuration" and enter a short description, your e-mail address as the user name <ukxxxxxx@uni-kassel.de>, the corresponding password and the server address mail.uni-kassel.de .

Finally, activate the account and select the calendar you want to synchronize.
Finally, click on "Synchronize now".

Go-Link of this page: https://www.uni-kassel.de/go/zugriff-thunderbird