Out of office note
The content on this page was translated automatically.
You can use automatic out-of-office notes if you are not present for a certain period of time (e.g. on vacation or business trips).
You must be connected to an Exchange or Office 365 account to be able to use this function.
Contents
Outlook 2016
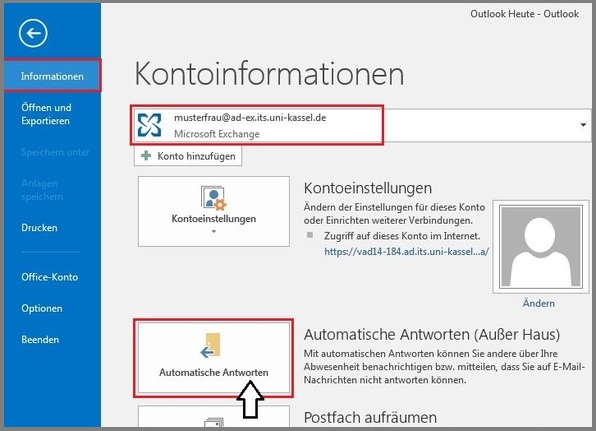
Please click on "File" in your menu (next to your start menu). Then select "Information". In the next step, click on the "Automatic replies (out of office)" button.
A dialog box will then open in which you must check the box next to "Send automatic reply". You can set the period in which your out-of-office note is to be sent by ticking the box next to "Only send during this period:" and then specifying a start and end date and time.
At the bottom of the dialog box is an input field in which you must enter your personal out-of-office note. Under the menu items "Within my organization" and "Outside my organization", you may be able to enter different absence notes. Confirm the process by clicking on "OK".

In this case, "Within my organization" means within Exchange. Therefore, the setting in the "Outside my organization" tab still needs to be set at the University of Kassel.
Outlook 2024
First click on "File" at the top left next to "Start" and then on the "Automatic replies (out of office)" button.

A new window will open. Here you have the option of setting the period in which the automatic replies are to be sent. First check the "Send automatic replies" box and then check the "Only send during this period" box. You can then set the date and time of your absence.
There is a text field at the bottom of the window. You can enter your personal out-of-office note in this field. Under the menu items "Inside/outside my organization" you can enter various absence notes. Confirm your entries by clicking on "OK".

Mac
Please click on "Extras" in the top menu bar in Outlook and then select "Out of office".

You can then make the settings for the out-of-office notification in the following window.
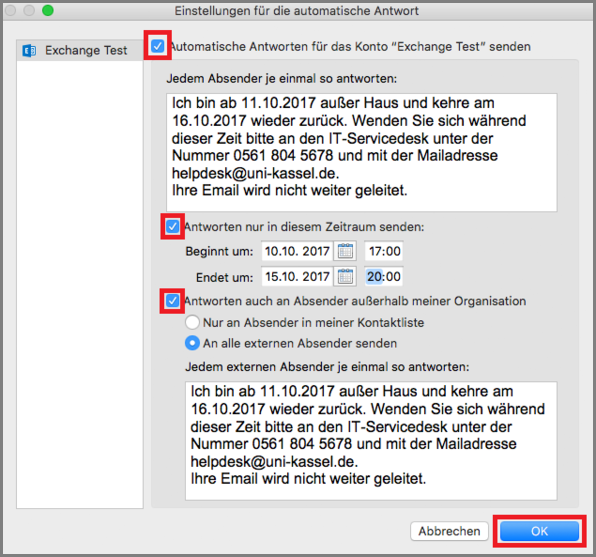
Then check the box "Send automatic replies for the Exchange Test account" and select "Send replies only during this period". Set the time period accordingly.
Now all senders who use the Exchange mail system will receive a reply. If you also want senders outside the Exchange mail system to receive a reply, check the box "Reply also to senders outside my organization".
You can then choose whether all senders should receive the notification or only those who are in your address book (contact list).
Web access
Click on the cogwheel in the upper black area on the right and then select "Automatic replies".

A dialog box will then open in which you must check the "Send automatic reply" box. You can set the period in which your out-of-office note is to be sent by ticking the box next to "Only send during this period:" and then setting a start and end date and time.
At the bottom of the dialog window is an input field in which you must enter your personal out-of-office note. Under the menu items "Within my organization" and "Outside my organization", you may be able to enter different absence notes. Confirm the process by clicking on "OK".
